Dinosaur game remix: using CSS animations and Javascript🦕🎮

Intro
Out of data? Poor network? This game has always been a reliable source of entertainment during those times. In this article, I'll guide you through the steps to create a spin-off of this classic game.
Step 1: Create the structure and add your elements using HTML
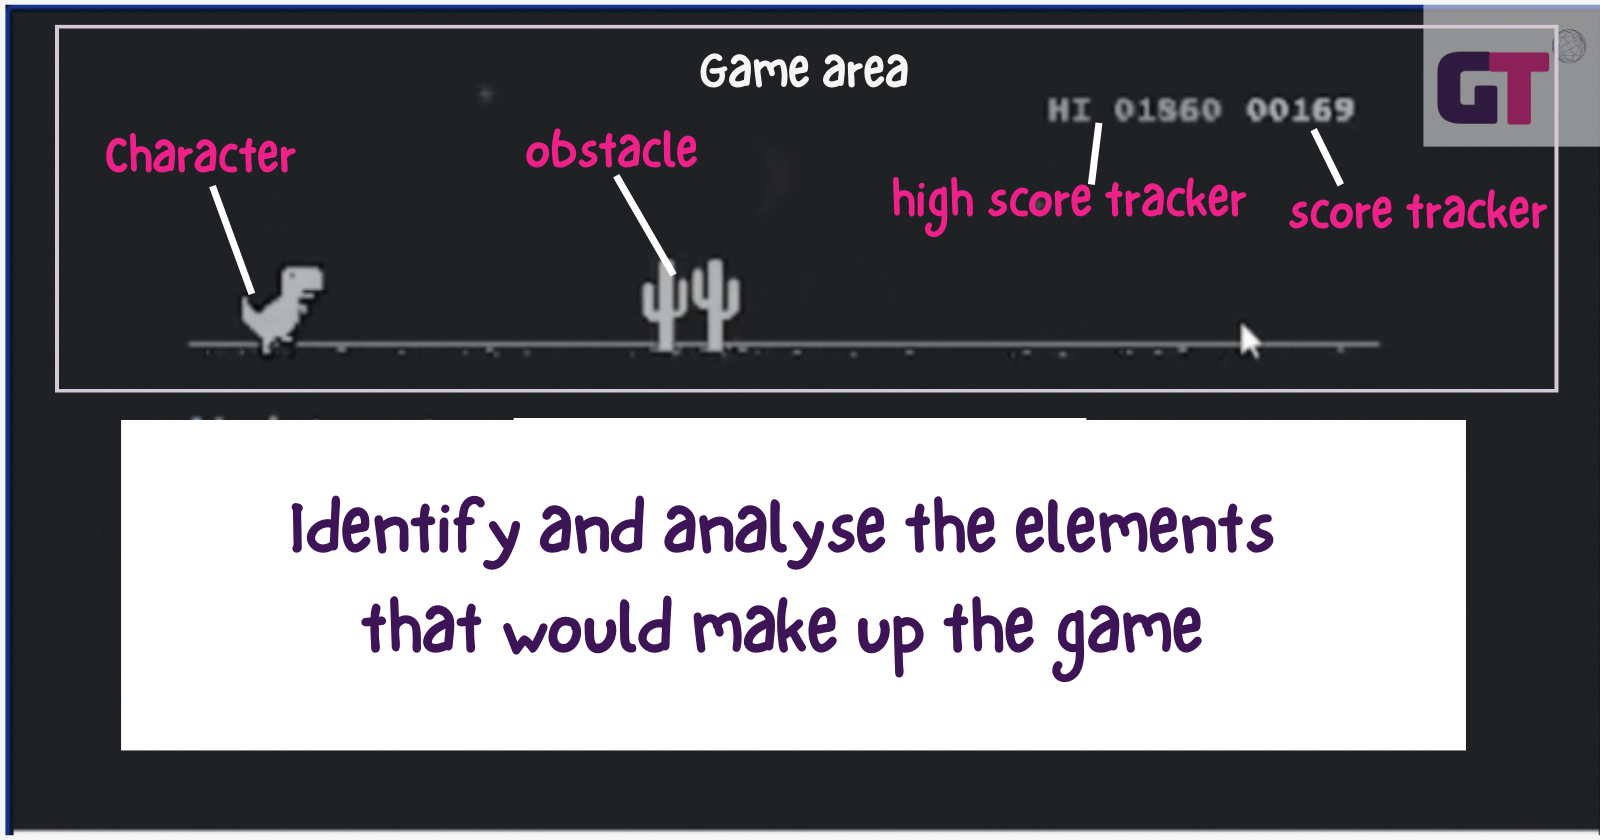
-Character: I created my character using Piskel, you can create yours or access mine here.
-Obstacle: I made use of a simple div box for this.
-High score tracker: the value changes if it is higher than the last recorded value.
- The score tracker increases as you progress in the game and resets when the game restarts.
-Game area: this contains all elements of the game.
Input all these elements into your HTML file
<!DOCTYPE html  >
<html lang="en"  >
<head>
    <meta charset="UTF-8">
    <meta http-equiv="X-UA-Compatible" content="IE=edge">
    <meta name="viewport" content="width=device-width, initial-scale=1.0">
    <link rel="stylesheet" href="style.css">
    <title>Document</title>
</head>
<body>
    <h1 style="position: absolute; left:520px; top: 50px; color: rgb(173, 174, 211); "> Dinosaur Game Remix </h1>
    <div id="game"><!-- GAME AREA-->
        <div class="HIscore"> HI <span id="HIscore"> </span>  </div><!--HIGH SCORE TRACKER-->
        <div id="score"> <span id="ten-th"> 0<span id="th">0
         <span id="hundred">0<span id="tens">0<span id="unit">0
          </span></span> </span> </span></span>  </div><!-- SCORE TRACKER-->

        <img src="clouds.png" alt="" class="cloud" ><!--CLOUD-->
        <img src="clouds.png" alt="" class="cloud1" ><!--CLOUD-->
          <img src="clouds.png" alt="" class="cloud2" ><!--CLOUD-->
        <div class="loseMsg"><!--LOSE MESSASGE-->
        <h1>YOU LOSE</h1>
        <h4>Click to Replay</h4>
       </div>
 <img src="character.gif" id="character"><!--CHARACTER-->
    </img>
    <div id="block"><!--OBSTACLE-->
    </div>
    </div>
    <script src="script.js "></script>
</body>
</html>
NOTE: After downloading the character and cloud, ensure you properly link it to your HTML file
Step 2: Using CSS design, position and style your elements
Create your CSS file and link it to your HTML file, then:-
place all your elements in their appropriate places and add colour to your work.
NOTE: ensure you set the "Lose Message" display to "none", as it would only be seen when the user loses the game.
*{
    margin: 0;
    padding: 0;
}
body{
    background-color: rgb(228, 228, 228);
    font-family: cursive,sans-serif;
}
/*clouds*/
.cloud{
    width: 50px;
    margin-right: 20px;
    left: 900px;
    height: 40px;
    position: absolute;
    top: 200px;
}
.cloud1{
    width: 50px;
    margin-right: 20px;
    left: 800px;
    height: 40px;
    position: absolute;
    top: 240px;
}

.cloud2{
    width: 50px;
    margin-right: 20px;
    left: 400px;
    height: 40px;
    position: absolute;
    top: 230px;
}
/*Game canvas */
#game{
    width: 800px;
    height: 250px;
    border: 1px solid black;
    margin: 150px auto;
background-color: rgb(0, 187, 255);
}
/* Score tracker*/
#score{
    position: absolute ;
    left: 1000px;
    top: 170px;
    font-size: 20px;
    font-family: cursive,sans-serif;
    color: red;
}
/*high score tracker*/
.HIscore{
    position: absolute ;
    left: 870px;
    top: 170px;
    font-size: 20px;
    font-family: cursive,sans-serif;
    color: red;
}
/* Loosing Message*/
.loseMsg{
    position: absolute;
    margin:94px 290px ;
    text-align: center;
    font-weight: 700;
    font-family: cursive, sans-serif ;
     color: red;
     display: none;
}
/*character*/
#character{
    width: 50px;
    height: 50px;

    position: relative;
    top: 200px;
    left: 20px;

}
/*obstacle*/
#block{
    width: 30px;
    height: 30px;
    background-color:brown;
    position: relative;
    top: 165px;
    left:550px;
}
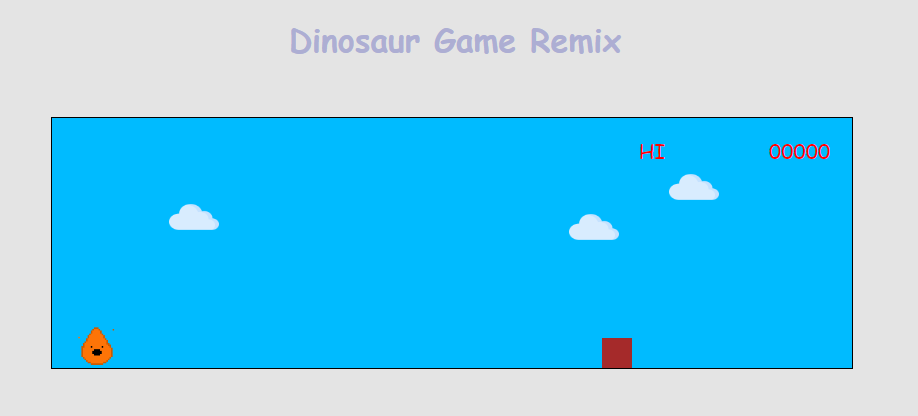
Output:
Step 3: add your CSS animations
We need to add animation to only three elements :
the clouds(to create a moving effect )
  @keyframes clouds{
      0%{left:1000px}
      30%{left: 800px;}
      70%{left: 500px;}
      100%{left: 380px;}
  }
  @keyframes clouds1{
      0%{left:900px}
      30%{left: 750px;}
      70%{left: 600px;}
      100%{left: 380px;}
  }

  .cloud{
      width: 50px;
      margin-right: 20px;
      left: 900px;

      height: 40px;
      position: absolute;
      top: 200px;
      animation: 4s linear 0.2s infinite  clouds;/*animation*/
  }
  .cloud1{
      width: 50px;
      margin-right: 20px;
      left: 800px;

      height: 40px;
      position: absolute;
      top: 240px;
      animation: 3.2s linear 0.2s infinite  clouds;/*animation*/
  }

  .cloud2{
      width: 50px;
      margin-right: 20px;
      left: 400px;

      height: 40px;
      position: absolute;
      top: 230px;
      animation: 3.5s linear 0.2s infinite  clouds1;/*animation*/}
the obstacle (so it moves towards the character)
#block{
    width: 30px;
    height: 30px;
    background-color:brown;
    position: relative;
    top: 165px;
    left:550px;
    animation: 1.7s linear 0s infinite normal none running block;/*animation*/

}
@keyframes block {
    0%{left:550px;}
    100%{left:-30px}
}
character (for this we aren't going to add the animation directly, but create a separate class for it, which we can remove and add to the character using Javascript )
  .animate{
      animation: jump 500ms  ;/*animation*/
  }

  @keyframes jump {
      0%{top: 200px;}
      30%{top: 150px;}
      70%{top: 150px;}
      100%{top: 200px;}

  }
Output:

Step4: Declare your variables in your Javascript file
Once you've created a javascript file, declare your variables, you can achieve this by using 'document.getElementById()' or 'document.querySelector()'
        /*declare variables*/
        var character = document.getElementById('character');
        var block = document.getElementById('block');
        var lostMsg = document.querySelector('.loseMsg')
        var youLost = false;
        var scoreCounter = 0;
        var score = document.getElementById('score');
        var unit =document.getElementById('unit');
        var tens = document.getElementById('tens');
        var hundred=document.getElementById('hundred');
        var thousand=document.getElementById('th');
        var TH =document.getElementById('ten-th');
        var gameStart = true;
        var HIscore = document.getElementById('HIscore');
        var interval;
Step 5: Create your jump function
Recall the animate class we created in step 3, to create the effect of the character jumping, we need to remove and add the "animate" class to the character.
   /**
   * Function to handle the character jump.
   */
  function jump(){
      if(!character.classList.contains("animate")){ // if the character is not currently animating
          character.classList.add("animate"); // add the animate class to start the animation
      }
      // after 500 milliseconds, remove the animate class to stop the animation
      setTimeout(function(){
          character.classList.remove("animate");
      },500)
      if(youLost==true){ // if the game is lost
          startSC(); // start the score counter
          lostMsg.style.display="none"; // hide the lose message
          block.style.display="block"; // show the block
          block.style.animation="block 2s infinite linear"; // start the block animation
          youLost=false; // set the game status to not lost
      }
  }
Step6: add game controls
To enable the user to play the game, we must ensure the jump function created in step 5 is called every time the space bar is clicked.
  /**
   * Event listener for the jump action.
   */
  document.body.onkeyup = function(e) {
      if (e.key == " " || // check if the space key is pressed
          e.code == "Space" ||      // check if the space key is pressed by its code
          e.keyCode == 32      // check if the space key is pressed by its keyCode
      ) {
          jump(); // call the jump function
      }
  };
To make the character jump when the screen is clicked, add the
"onclick "attribute to your HTML file as shown below.
<html lang="en" onclick="jump()" >
NOTE: notice how the character passes through the obstacle, which makes the game never-ending, this will be fixed in the next step.
Step 7: Stop the game when the character comes in contact with the obstacle
Enable the character to detect when it touches the obstacle, and end the the game
  // Stop score counter function
  function stopSC() {
      clearInterval(interval);
  }

  // Check for character collision with block function
  var checkDead = setInterval(function () {
      var characterTop = parseInt(window.getComputedStyle(character).getPropertyValue("top"));
      var blockLeft = parseInt(window.getComputedStyle(block).getPropertyValue("left"));

      if (blockLeft < 50 && blockLeft > 0 && characterTop >= 180) {
          block.style.animation = "none";
          block.style.display = "none";
          youLost = true;
          lostMsg.style.display = "block";
  /*RECORD CURRENT VALUE AS HIGH SCORE , IF IT IS HIGHER THAN PREVIOUS HIGH SCORE*/
          var newScore = score.innerHTML;
          var currentScore = HIscore.innerHTML;
          if (currentScore == "") {
              HIscore.innerHTML = newScore;
          } else if (newScore > HIscore.innerHTML) {
              HIscore.innerHTML = newScore;
          }

          stopSC();
      }
  }, 10)
Step 8: Keep a record of the score as the game progresses.
  // Reset score counter function
  function resetSC() {
      clearInterval(interval);
      var unit = "0";
      var tens = "0";
      var hundred = "0";
      var thousand = "0";
      var TH = "0";

      score.innerHTML = TH + thousand + hundred + tens + unit;
      scoreCounter = 0;
  }

  // Increment score counter function
  function counter() {
      scoreCounter++;
      if (scoreCounter <= 9) {
          score.innerHTML = "0" + "0" + "0" + "0" + scoreCounter;
      }
      if (scoreCounter <= 99 && scoreCounter > 9) {
          score.innerHTML = "0" + "0" + "0" + scoreCounter;
      }
      if (scoreCounter <= 999 && scoreCounter > 99) {
          score.innerHTML = "0" + "0" + scoreCounter;
      }
      if (scoreCounter <= 9999 && scoreCounter > 999) {
          score.innerHTML = "0" + scoreCounter;
      }
      if (scoreCounter > 9999) {
          score.innerHTML = scoreCounter;
      }
  }

    // Start score counter function
      function startSC() {
          resetSC();
          clearInterval(interval);
          interval = setInterval(counter, 150);
      }

      // Start the game on page load
      window.onload = startSC();
FINAL PRODUCT:
https://gracetoffy.github.io/dino/dinosaur%20game/index.html


